
Samurai Builds
Samurai Builds Gallery
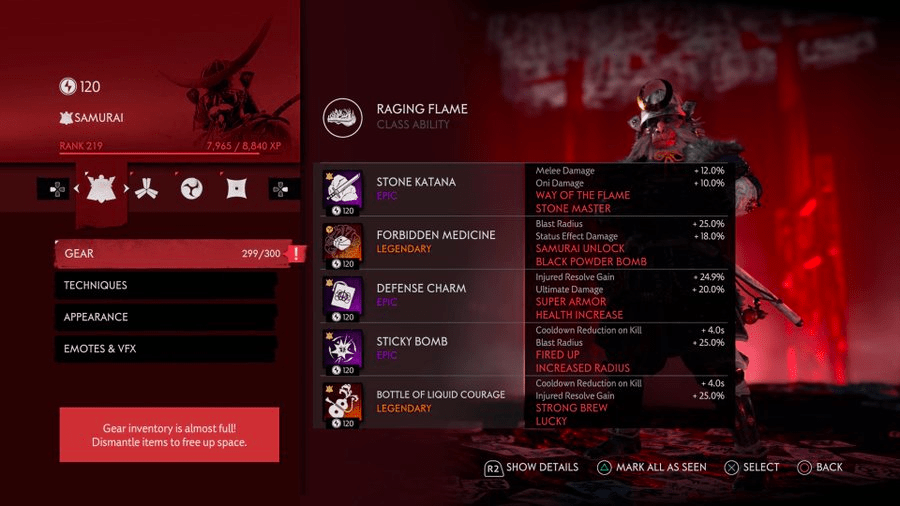
Raid
Setup geared toward cheesing Iyo with Wind Kicks

ABILITY: Raging Flame
TECHNIQUES: 4-3-2
A Samurai that focuses on cheesing Iyo with wind kicks and prioritizes melee damage to do it.
Pros:
– Very high Melee & Ultimate Damage
– Fast stagger of Iyo during duel
– Ultimate for killing Iyo afer Duel (masamuen proc = 1 shot iyo with Ultimate)
Cons:
– Mid skill floor to learn, but easy after some practice
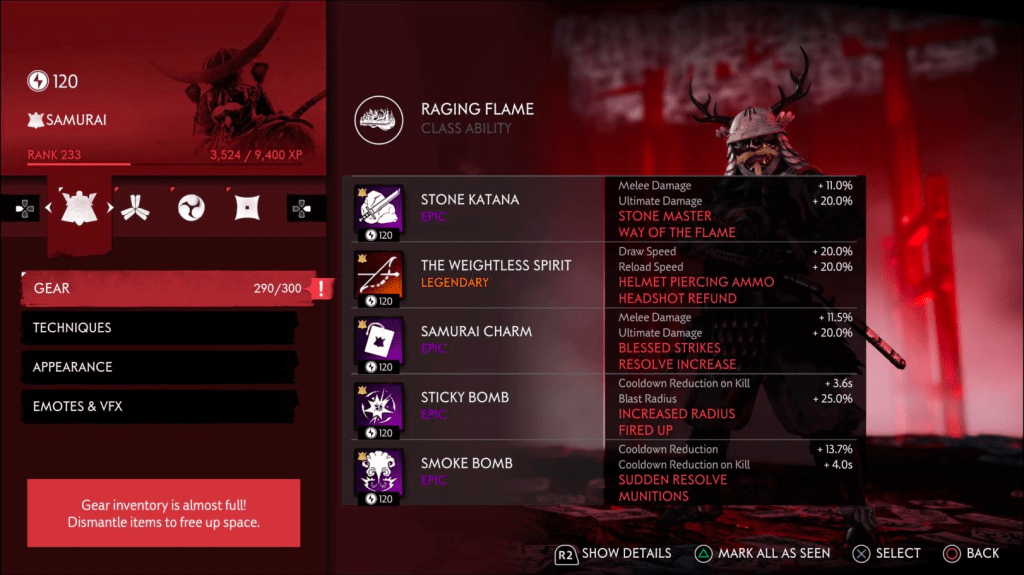
Rivals
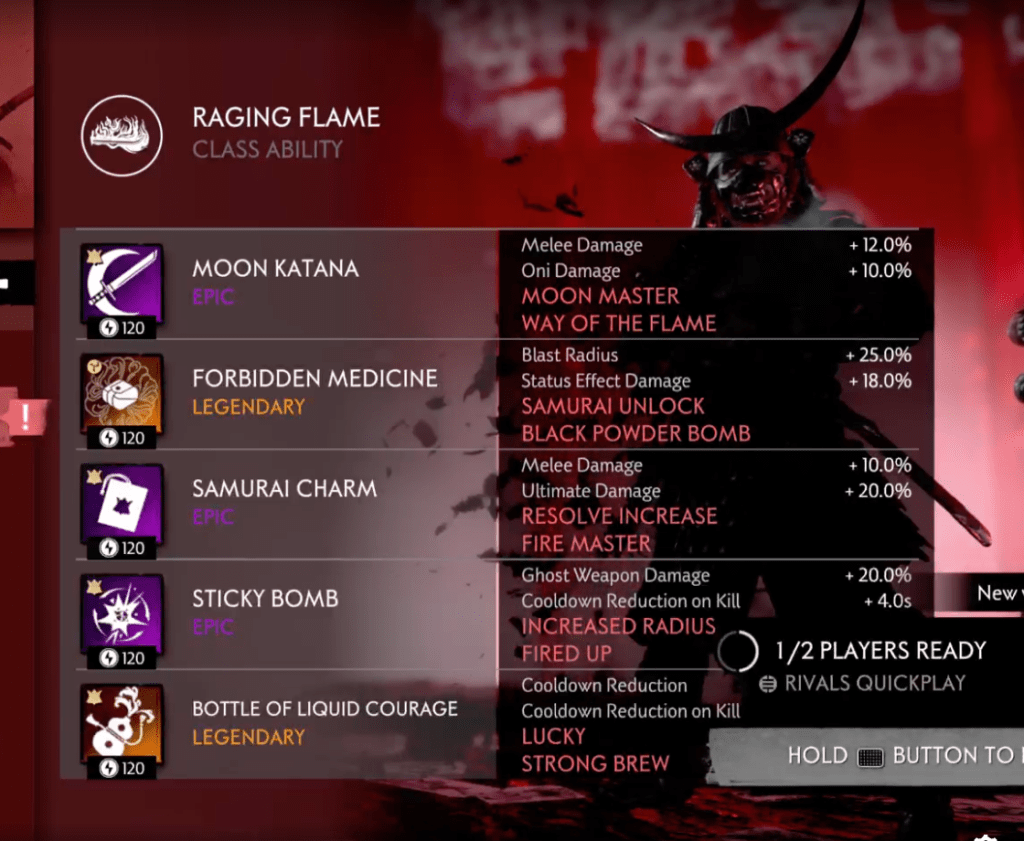
ABILITY: Raging Flame
TECHNIQUES: 4-3-2
GodLis Rivals setup
Pros:
–
–
Cons:
–

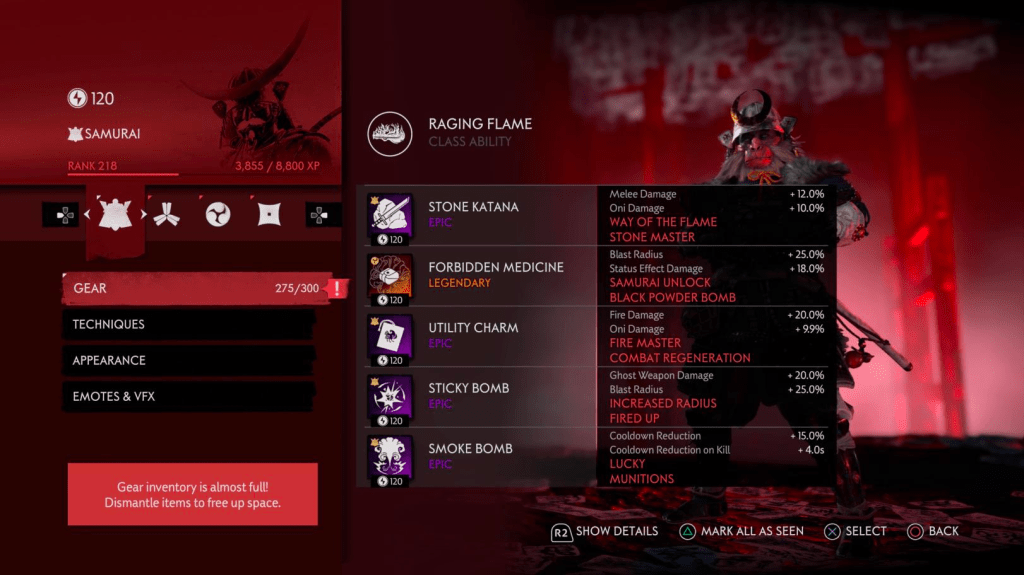
ABILITY: Raging Flame
TECHNIQUES: 4-3-2
A rivals variant that maximizes Ultimate damage in exchange for other damage
Pros:
– Very high ultimate damage per strike
– Self-heals provided by Forbidden Medicine & Combat Regen
Cons:
– Loss of Caltrops or Smoke for munitions
– Sacrifices ‘Deep Strikes’ tech for 2 Legendaries

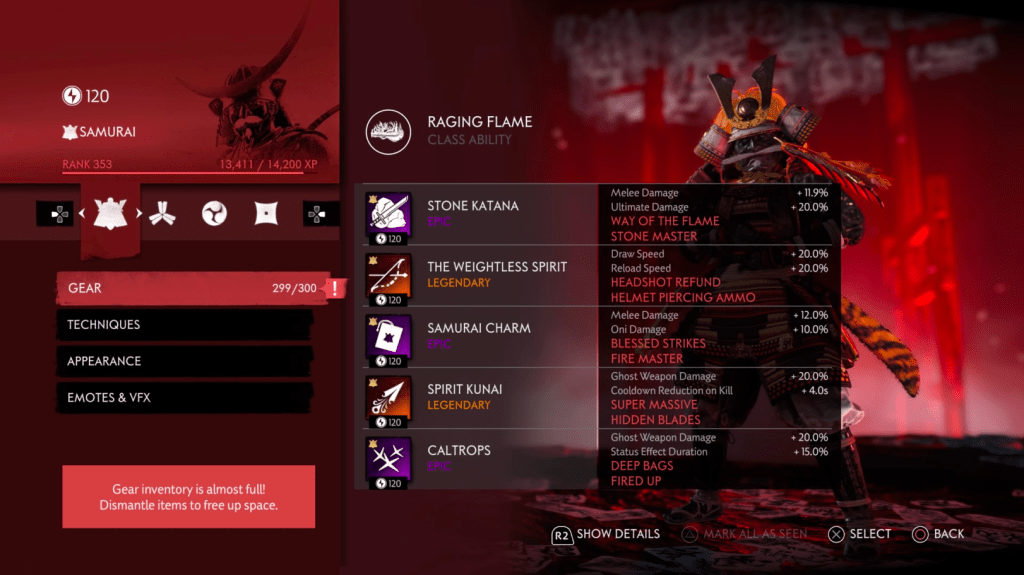
ABILITY: Raging Flame
TECHNIQUES: 2-3-2
A strong Rivals competitor that prioritizes damage while still having heal sources.
Pros:
– Lots of damage output
– Good Crowd control and single-target DPS
– Good sources of healing
Cons:
– Caltrops can be tricky for newer players to use effectively

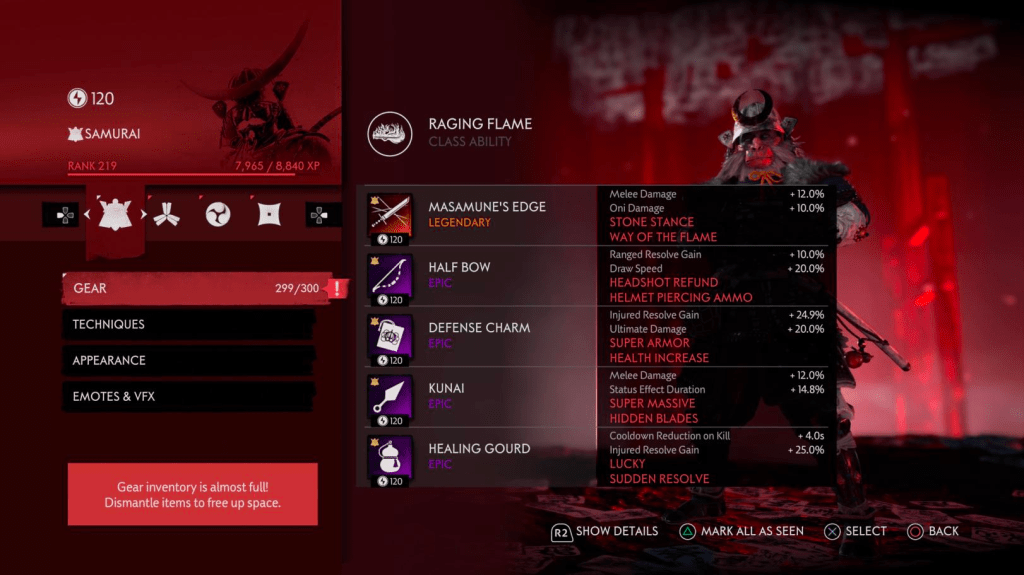
ABILITY: Raging Flame
TECHNIQUES: 4-3-2
WS for fast headshots for resolve & DPS on single targets, BoLC for fast resolve gain
Pros:
– High single start DPS
– Lots of resolve sources
Cons:
– High skill floor using WS vs bombs
– Limited healing (Blessed Strikes only)
Survival

ABILITY: Raging Flame
TECHNIQUES: 4-3-2
Swaps out Samurai charm for Enjo’s (more Fire% available, use Combat Regen for healing, Enjos 15% bonus at Full Health)
Pros:
– +15% more damage on ALL attack types (Enjos)
– Forbidden Medicine to top up (to full hp)
– Combat Regen for on-demand healing
Cons:
– Must stay at full hp
– Dependent on having a good team
– Not new-player friendly

ABILITY: Raging Flame
TECHNIQUES: 2-3-2
A strong basis for Survival game mode
Pros:
– Blessed Strike & Forbidden Medicine for self-healing
– Forbidden Medicine for AOE damage & crowd control
– Smoke bomb for de-aggro and munitions and controlling spawns
Cons:
– Requires Forbidden Medicine (must play/run Ronin to get bomb packs to drop)

ABILITY: Raging Flame
TECHNIQUES: 2-3-2
Swaps out Samurai charm for Stealth Charm (to roll Status Effect Damage + Fire Damage)
Pros:
– More Status Damage
– Forbidden Medicine to top up (to full hp)
– Combat Regen for on-demand healing
Cons:
– Must stay at full hp
– Dependent on having a good team
– Not new-player friendly
ABILITY: Raging Flame
TECHNIQUES: 2-3-2
Swaps out Samurai charm for Utility Charm (more Fire% available, use Combat Regen for healing)
Pros:
– Utility charm is easier to roll properties
– Higher Fire Damage % available
– Combat Regen for on-demand healing
Cons:
– No Blessed Strikes (need to leave combat for CR to proc)
ABILITY: Raging Flame
TECHNIQUES: 4-3-2
Meta variant that uses Weightless Spirit (Legendary halfbow) for rapid firing arrows for ranged damage and headshots for resolve.
Pros:
– Very fast resolve gain
– Great at sniping due to Arrows not Descending (WS legendary property)
– Great DPS on Single targets and groups (using Ultimate)
Cons:
– Lacks crowd control option (no bombs)
– Hybrid playstyle (of range + melee)
ABILITY: Spirit Pull
TECHNIQUES: 2-3-2
Variant that prioritizes melee damage & uses IRG to generate resolve, use Ultimate, heal, repeat.
Pros:
– Very fast resolve build
– Can be fun for beginners who are regularly taking chip damage or getting hit
– Good healing (Spirit Pull & Gourd)
Cons:
– High skill floor to be effective
– Very risky and can die easily (learn what to and not to get hit by)
– Requires constant healing
ABILITY: Raging Flame
TECHNIQUES: 4-3-2
Variant that prioritizes IRG to build resolve when getting ‘struck’. Note that volume of damage does not matter, only whether you get struck or not.
Pros:
– Extremely fast resolve build
– Uses BolC to generate even more resolve than regular IRG variant
Cons:
– High skill floor to be effective
– Very risky and can die easily (learn what to and not to get hit by)
– Limited healing (use FM for heals)
Trials
Hellmode

ABILITY: Raging Flame
TECHNIQUES: 4-3-2
Samurai that prioritizes damage and uses bombs for crowd control. Recommended for experienced players who have a dedicated team (not random matchmake hellmode)
Pros:
– Very High DPS (3-Shot Elder-Oni)
– Good Resolve Gain (Concussions + Sticky)
– Good crowd control (bombs)
Cons:
– Limited Healing (Forbidden Medicine only)
– High skill floor to become effective
Takes a LOT of practice to manage Sticky + Smoke & bombs

ABILITY: Raging Flame
TECHNIQUES: 4-3-2
Balances damage with crowd control ability and refreshes using Spirit Kunai. Plays similar to Ronin playstyle (but less Ghost Weapon damage)
Pros:
– Good damage output
– Spirit Kunai for Cooldown management
– Good self-healing sources
Cons:
– Spirit Kunai management for refreshse
– Blessed strikes requires combat to heal
ABILITY: Raging Flame
TECHNIQUES: 2-3-2
Samurai who focuses on headshots for resolve, uses WS for fast/far shots, Sticky to build resolve, and uses Ultimate to kill high-HP targets
Pros:
– Fast resolve building
– Very high melee damage & Ultimate damage
Cons:
– Limited healing (Only healing while RF is active)
– No crowd control
Solo

ABILITY: Spirit Pull
TECHNIQUES: 2-3-2
Meta variant that capitalizes on MMC & bombs for resolve & damage. Use bombs, blessed strikes, spirit pull for lots of healing. Caltrops and melee stagger helps to shut down enemies quickly so its easier to manage crowds (+ bombs & kunai for stun)
Pros:
– LOTS of healing sources
– Great resolve build
– Great melee stagger sources
Cons:
– No Smoke Bomb (to give you a breather)
Immunity Week

ABILITY: Spirit Pull
TECHNIQUES: 4-3-2
Samurai build that focuses on melee strategies and staying at Full hp to take advantage of Enjos Remorse bonus
Pros:
– Good self-heal sources (Combat Regen, Forbidden Medicine, Spirit Pull)
-High melee damage output
Cons:
– Loses some crowd control (due to weaker Black Powder with Immunity week)
“A Samurai knows how to apply the right amount of force; too little and you lose respect, too much and you lose opportunity.”
– Lord Shimura
